Background Removal Video: The Complete How-To Guide

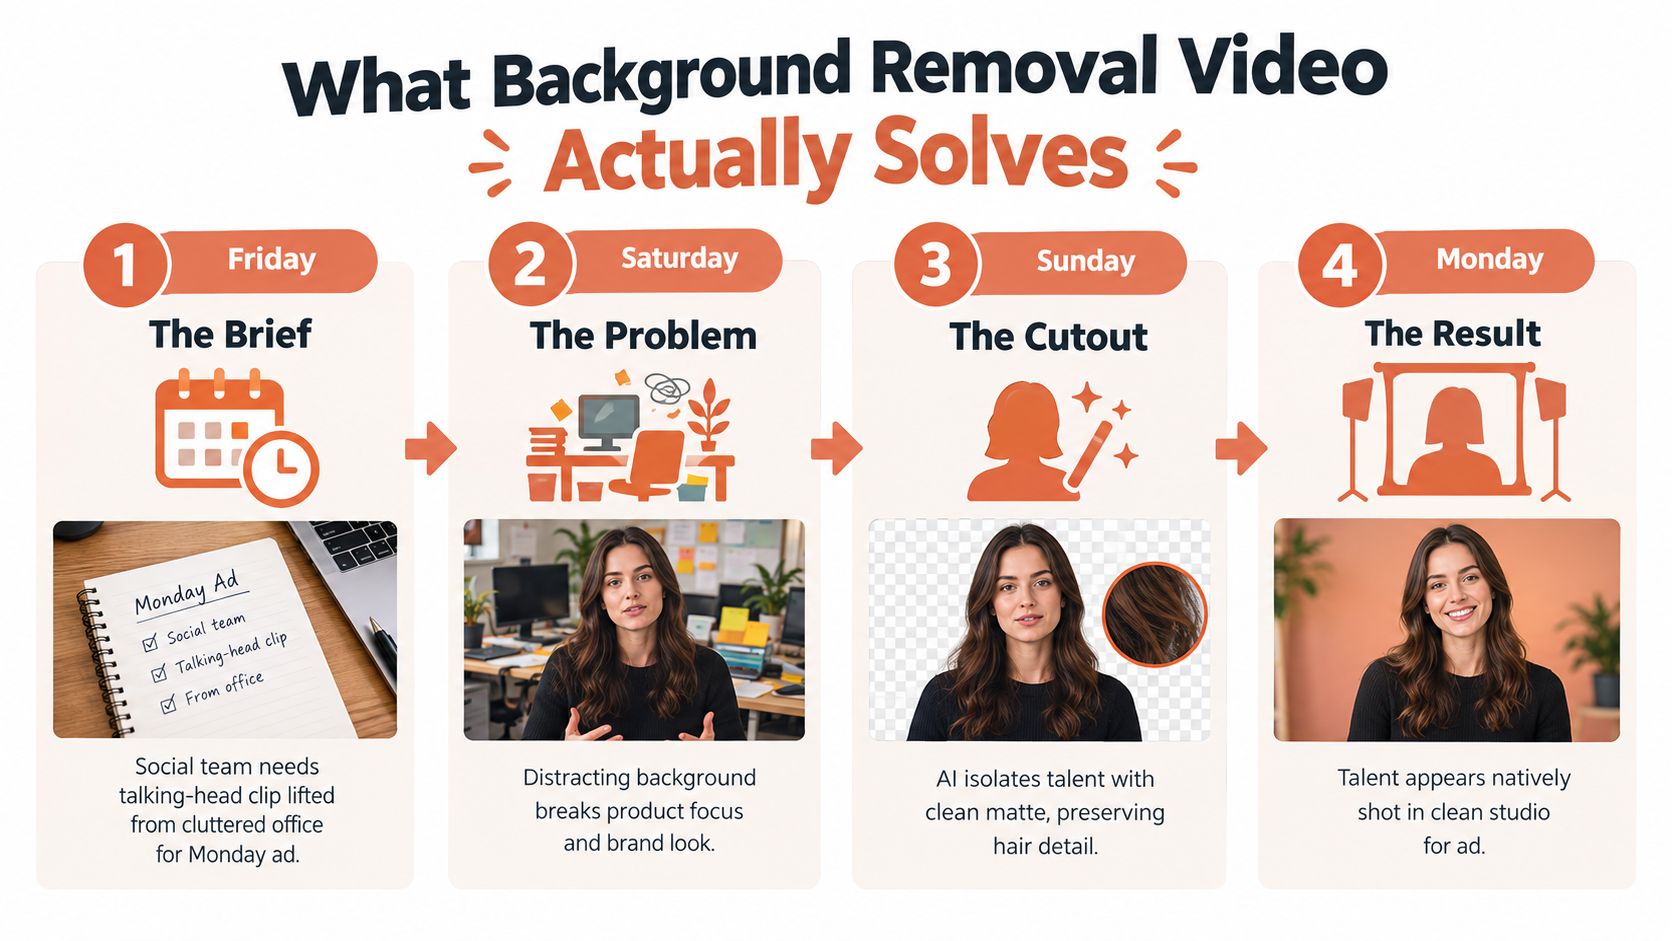
It’s Friday afternoon, and a social team has one useful talking-head clip for a product ad. The talent is sharp, the message works, and the office behind them is a mess of shelves, cables, and mismatched furniture. By Monday, that person needs to appear as if they were filmed in a controlled studio.
That’s where background removal video becomes a production decision, not a button you click and forget. The right method depends on the subject, movement, lighting, edge detail, delivery format, and how much artifact risk the brand can tolerate.
Table of Contents
- What Background Removal Video Actually Solves
- Preparing Your Footage for the Cleanest Cutout
- AI-Powered Background Removal Video Workflows
- Manual Edge Refinement When AI Is Not Enough
- Choosing the Right Method for Your Scene
- Replacing Backgrounds Without Breaking Realism
- A Production Checklist and Where This Is Heading
What Background Removal Video Actually Solves
Background removal video isolates a subject across a sequence of frames so the original background can be replaced, keyed, blurred, or composited into a new environment. The output is usually a matte or alpha channel that tells the editing software which pixels belong to the subject and which belong to the plate.
The process has a long computer-vision history. Early background subtraction methods appeared in the late 1970s, and later work on real-time background subtraction and shadow detection helped establish techniques that became widely used in 1999. Modern systems evolved from frame-difference background models toward statistical approaches and neural networks designed for more complicated scenes, as documented in this review of video object segmentation methods.
Where the cutout belongs in the pipeline
A reliable job starts before the editor opens an AI tool:
- Brief: Define the destination, brand look, duration, aspect ratio, and whether the subject needs to interact with the replacement environment.
- Preparation: Control lighting, framing, wardrobe, exposure, and reference plates during the shoot.
- Primary matte: Generate an initial isolation with an AI service, desktop model, chroma key, or manual roto.
- Composite: Place the subject over the new background, then match color, sharpness, grain, shadows, and movement.
- Delivery: Export with the correct alpha workflow or as a finished composite, then inspect the actual publishing file.
Green-screen keying and algorithmic isolation solve related problems differently. Chroma keying relies on a deliberately chosen color range and works best when the screen is evenly lit and separated from the subject. Neural isolation can work without a backdrop, which makes it useful for interviews, creator footage, product demonstrations, and repurposed clips, but it still has to infer ambiguous edges.
For quick turnaround, quick background removal by Satura AI can fit the first-pass stage of a browser-based workflow. The important limitation is that a first pass isn’t automatically a finished composite. Hair, translucent materials, shadows, reflections, and fast movement may still need correction before the clip looks native to its new setting.
Preparing Your Footage for the Cleanest Cutout
The cleanest matte usually starts with a better plate, not a more aggressive model. AI can estimate a subject from difficult footage, but it can’t recover edge information that was crushed by blur, clipping, colored spill, or a subject cropped against the frame boundary.
Fix the light before you record
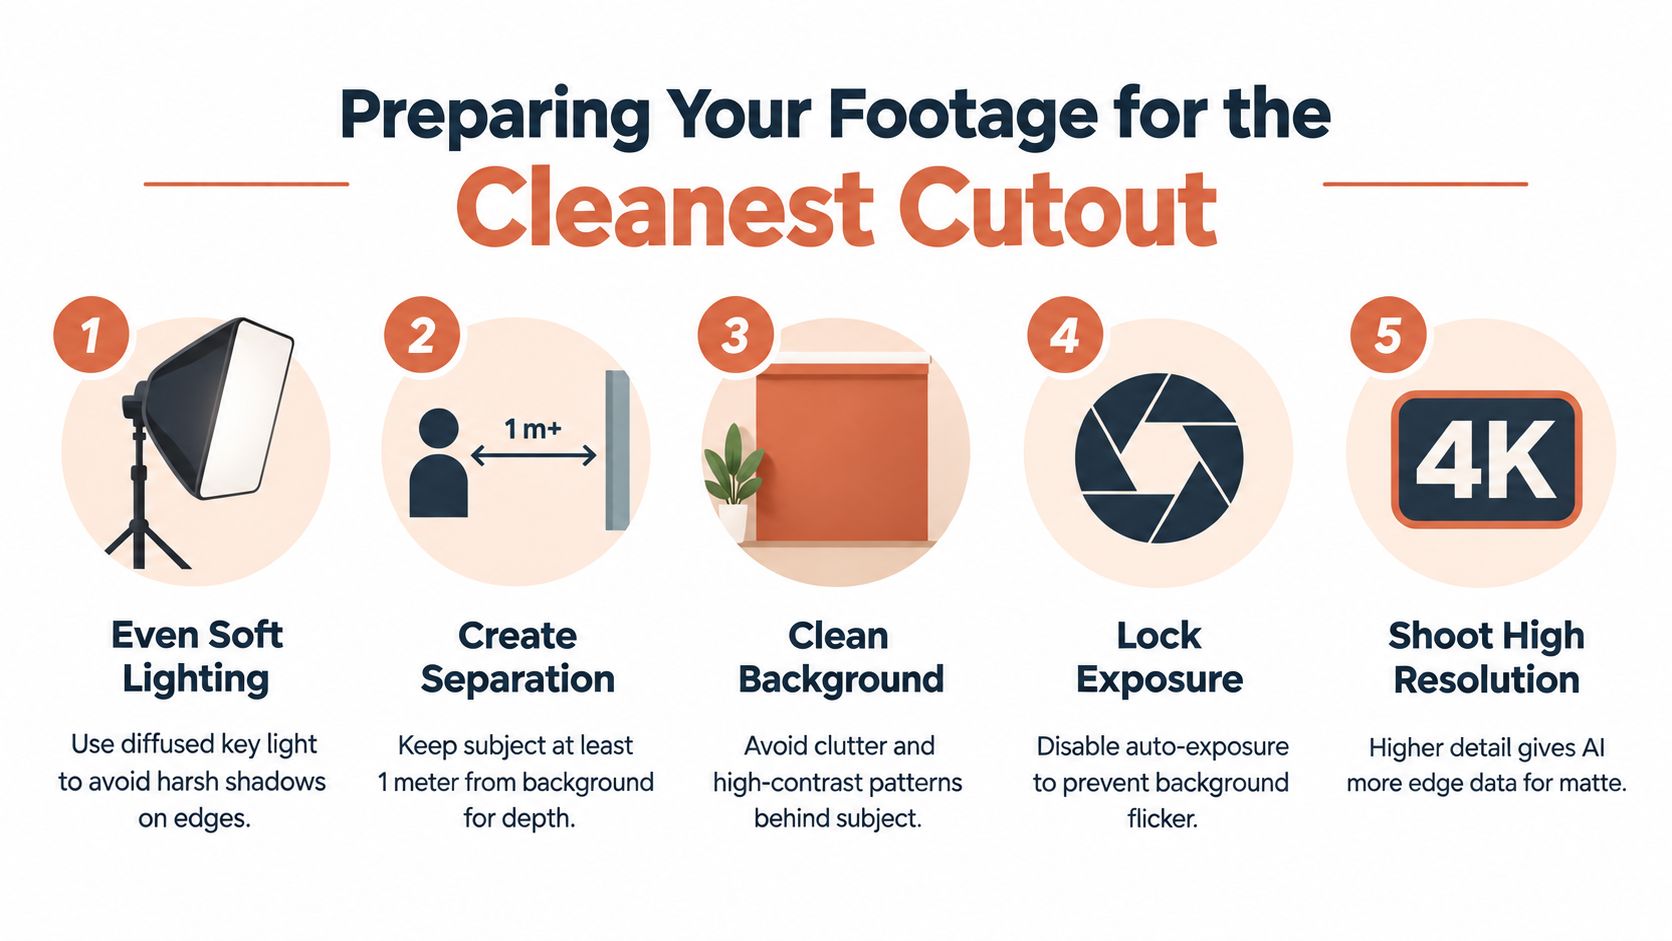
Use a broad, soft key and keep exposure stable. Hard shadows create uncertain transitions around shoulders, hands, and hair, while a changing auto-exposure response can make the matte appear to pulse from frame to frame.
Give the talent physical separation from the background. The supplied filming guidance for the infographic recommends keeping the subject at least one meter from the background, which helps reduce shadows and reflected color around the edges. A neutral background with low visual clutter also gives the model fewer competing shapes to interpret.
Avoid colored light bouncing onto hair or clothing. Green or blue spill can make a clean extraction look contaminated, especially when the replacement background has a different color temperature.
Frame for the matte, not only the composition
Leave enough headroom and don’t crop the talent against the frame edge. Keep the eyes near the upper third when the shot is designed for a talking-head layout, but preserve extra space around hair and shoulders so the isolation model has usable pixels to classify.
Wardrobe can save a surprising amount of cleanup. Avoid clothing that matches the background, skin, or hair tones, and be cautious with sheer fabric, fine mesh, busy patterns, and loose accessories. These elements can be recoverable, but they turn a simple mask into an edge-refinement task.
Shoot an empty-background reference plate for about one second when the setup allows it. That plate can support garbage-mask work, spill cleanup, and visual comparison when the editor needs to determine whether a strange edge belongs to the subject or the original environment.
Audio still matters. Record a sync slate or spoken production note, and preserve the original timecode relationship when creating an isolated version. A visually perfect cutout that drifts out of sync is still a failed deliverable.
Before processing, run a timeline pre-flight:
- Resolution: Confirm the source dimensions and avoid unnecessary scaling before segmentation.
- Frame rate: Match the project and source interpretation so motion doesn’t produce avoidable cadence problems.
- Codec: Identify whether the footage is heavily compressed or already rendered multiple times.
- Color: Note whether the source is log or Rec.709, because contrast and edge color influence cleanup.
- Framing: Check that no important hair, hands, or props touch the frame boundary.
For a product-focused preparation workflow, this background removal product kit walkthrough can help organize the source assets and intended output before the edit begins.
AI-Powered Background Removal Video Workflows
Editors generally reach for one of three AI routes. The mistake is choosing by tool popularity instead of asking whether the shot needs a fast approximation, an editable matte, or a controlled finish.
Cloud tools and browser services
Cloud APIs and browser tools are the fastest option for clean, short social clips. Services such as Runway, Unscreen alternatives, CapCut web tools, and dedicated background-removal platforms let an editor upload footage and receive an isolated result without building a local roto setup.
They work well for a well-lit person against a quiet background, especially when the output is going straight into a vertical post. Hair can look acceptable at normal mobile viewing size, but flyaways and semi-transparent edges are where quality often drops. Cloud processing also introduces upload time, privacy considerations, and usage costs that scale with footage volume.
Desktop tools with AI assistance
After Effects, DaVinci Resolve, and Mocha Pro are better choices when the matte must remain editable. AI-assisted tools can establish the subject quickly, then let the editor correct specific frames, expand or contract the edge, and track changes through the shot.
That control matters for broadcast, paid advertising, large-format delivery, or any job where a halo will be noticed. The trade-off is labor. A desktop model may produce the base matte quickly, but the editor still owns the review, correction, edge decontamination, and final export.
In-app generators
AI features inside Premiere, Final Cut Pro, and mobile editing suites reduce tool switching. They’re convenient for creators who need a finished post rather than a compositing asset, and they can be enough when the subject is large, the background is simple, and the publishing resolution is modest.
They’re less suitable when you need a clean alpha channel, detailed hair treatment, or a matte that another compositor will revise. For teams comparing adjacent creative automation tools, this AI video generation tools guide provides broader workflow context, but background extraction still needs its own quality check.
| Workflow | Best For | Hair/Edge Quality | Typical Cost | Turnaround |
|---|---|---|---|---|
| Cloud API or browser tool | Simple social and marketing clips | Variable, strongest on clear silhouettes | Usage-based or plan-based | Fast |
| Desktop AI-assisted roto | Ads, broadcast, reframing, editable mattes | Higher control and refinement potential | Software plus labor | Moderate |
| In-app generator | Quick vertical posts and creator edits | Adequate for simple scenes | Included or plan-based | Fast |
| Hybrid workflow | Important clips with a short deadline | AI speed with manual correction | Combined tool and labor cost | Fast to moderate |
Export the result as ProRes 4444 with alpha or a PNG sequence when another compositing stage will follow. A flattened preview may look fine, but it removes the flexibility needed to repair edges without damaging the subject.
Manual Edge Refinement When AI Is Not Enough
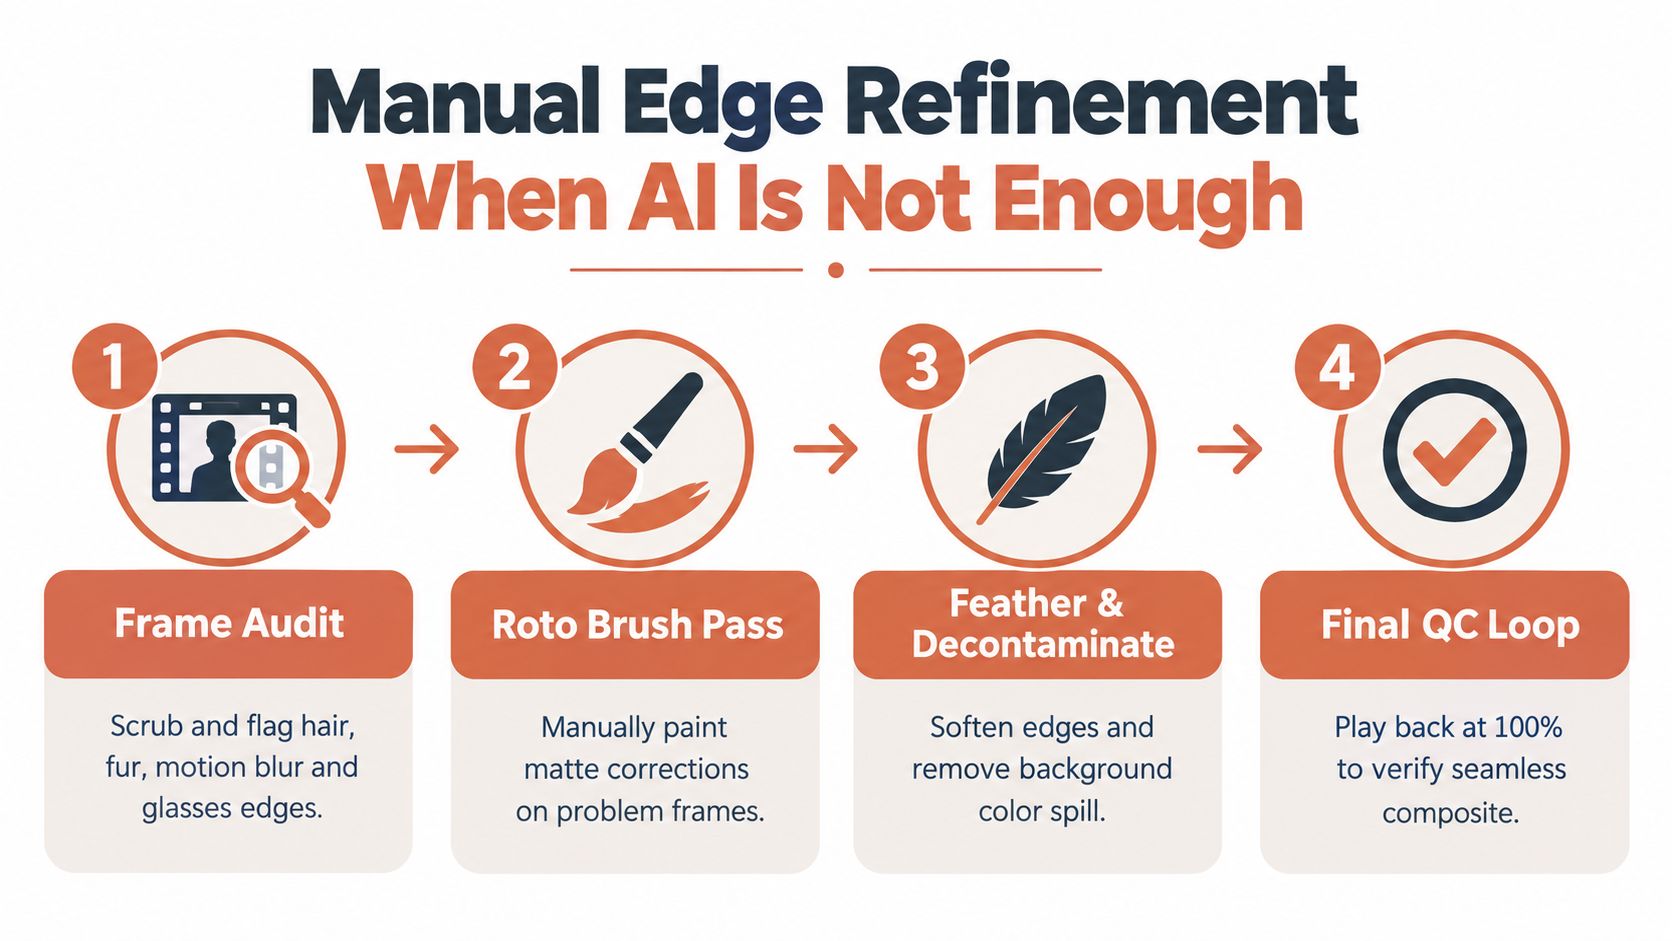
AI should give you a starting matte, not permission to skip the inspection pass. Scrub the shot at full resolution and flag the moments where hair, fur, motion blur, glasses, smoke, transparent fabric, or overlapping objects change shape.
The first question is whether the model lost the subject or included the plate. Those failures need different corrections. Expanding a matte can recover a clipped shoulder, but it won’t remove a background-colored fringe that has already mixed into the edge pixels.
Build a controlled base matte
In After Effects, Roto Brush can establish the subject selection, while DaVinci Resolve’s Magic Mask can provide a tracked starting point. Mocha Pro is useful when planar movement or difficult tracking needs a separate pass. None of these tools eliminates judgment. They reduce the amount of painting required.
Use a three-pass routine:
- Lock the rough silhouette: Track the broad subject first. Don’t chase individual hairs while the torso and limbs are still drifting.
- Remove leftover plate pixels: Add garbage mattes for areas the model mistakenly includes, such as furniture beside an arm or gaps between moving limbs.
- Chase problem frames: Inspect every few frames around fast movement, occlusion, and changes in direction. Correct the frames where the edge fails, then check the surrounding playback for drift.
Treat color contamination as a separate problem
A technically accurate alpha can still look wrong if the old background has contaminated the subject. Use edge color suppression or decontamination carefully, because over-processing can turn hair gray, skin dull, or bright clothing unnaturally thin.
Pay special attention to desaturated edges. They often indicate that the original plate is bleeding through, not that the subject naturally has a pale outline. Compare the isolated subject against both the original plate and the replacement background, because an edge that hides on black may become obvious against a bright or saturated scene.
Keep the matte inline while you’re still making editorial decisions. Promote it to a true alpha channel when the shot is ready for compositing or handoff, and preserve a version with the editable matte controls if someone may need to revisit the extraction.
Practical rule: If the edge flickers during playback, don’t judge the shot from a still frame. Temporal behavior is part of matte quality.
Choosing the Right Method for Your Scene
Before opening a tool, score the shot against five questions: how complicated is the movement, how much fine detail must survive, how quickly is the client waiting, how much labor can the budget absorb, and how visible will artifacts be in the final placement?
A static presenter in soft light is a different job from a dancer under colored stage lighting. The first may suit a cloud pass with a brief inspection. The second usually needs a desktop model, a controlled matte, and manual work around hair, blur, and occlusion.
| Method | Best Scene Type | Turnaround | Edge Quality | Typical Cost |
|---|---|---|---|---|
| Physical green screen | Planned shoots with controlled lighting | Fast in post when well captured | Consistent when spill is controlled | Production setup plus editing |
| AI cloud service | Simple talking heads and social clips | Fast | Good for clear edges, variable on detail | Usage-based |
| Desktop AI model | Complex movement and professional composites | Moderate | Stronger control and correction options | Software plus editing labor |
| Full manual roto | Critical shots with severe ambiguity | Slowest | Highest controllability | Labor-intensive |
| Hybrid AI plus manual pass | Commercial work under deadline | Fast to moderate | Practical balance of speed and precision | Combined cost |
A green screen isn’t automatically easier. Poorly lit screens, shadows, wrinkles, spill, and compression can create their own cleanup. If you’re planning a controlled shoot, this guide to how to make green screen videos covers the capture side of that decision.
Use a cloud method when the subject is readable, the replacement is forgiving, and the delivery is small or time-sensitive. Move to desktop processing when the shot will be reframed, layered with graphics, or inspected closely. Choose manual roto when a brand cannot tolerate a visible halo and the scene contains transparent or rapidly moving detail.
For teams evaluating an AI-assisted route, this Claude background removal guide is relevant when the task needs to sit inside a broader assistant-driven creative workflow rather than a standalone upload.
The output destination should make the final call. A fast social post can hide small edge errors through scale and motion. A product ad with a clean studio replacement cannot.
Replacing Backgrounds Without Breaking Realism
Removing the original plate is only half the job. A subject can have a mathematically clean alpha and still look pasted on because the replacement background disagrees with the foreground’s light, sharpness, grain, perspective, or motion.
Start with exposure and color temperature. A warm subject over a cool environment needs a deliberate match, not a saturation boost. Compare the brightest areas, shadow density, skin tones, and neutral objects before applying a global grade.

Make the subject belong to the new environment
Add a contact shadow where the talent meets the implied floor or surface. If the original scene had light bouncing from a wall, recreate a subtle version of that influence on the subject. A replacement background with strong directional light needs corresponding shape and contrast on the foreground, or the composite will feel detached.
Match image structure as well as color:
- Sharpness: Keep a plate slightly soft when the foreground was shot with shallow focus. A razor-sharp replacement behind a soft subject makes the depth relationship implausible.
- Grain: Add compatible texture when the source and replacement have different noise structures.
- Perspective: Align horizon lines, lens height, and scale with the subject’s camera position.
- Parallax: Track or animate the replacement when the camera moves. A locked background behind handheld footage can expose the composite immediately.
- Reflections: Check glasses, windows, polished surfaces, and hair highlights. Removing the background doesn’t automatically rebuild the reflected environment.
Heavy blur is a common shortcut for hiding matte defects. It can soften a halo, but it also removes useful depth cues and may make a branded ad look artificially shallow. Use blur because the scene calls for it, not because the edge needs cover.
Brand consistency adds another layer. If a team replaces backgrounds across a campaign, save approved colors, logos, fonts, and environmental treatments, then review several assets together. A clean individual clip can still fail when its lighting and background style don’t match the rest of the campaign.
A credible composite doesn’t announce the cutout. It preserves the visual clues that tell the viewer where the subject stands, where the light comes from, and how the camera moves.
A Production Checklist and Where This Is Heading
A repeatable checklist keeps background removal video from becoming a sequence of avoidable repairs. Run it before delivery, not after a client points out the problem.
The working checklist
- Prepare the set: Use soft, stable lighting and create separation. This reduces harsh edge shadows and color spill.
- Protect the frame: Leave room around hair, hands, and shoulders. This prevents the model from treating the frame boundary as a subject boundary.
- Capture a reference plate: Record the empty background. This helps identify plate contamination and supports garbage-mask cleanup.
- Run the primary isolation: Pick cloud, desktop, chroma key, or manual roto based on the scene, not convenience alone.
- Inspect motion: Watch the matte through fast movement, occlusion, blur, and overlapping objects. This catches flicker and identity loss.
- Refine the edge: Correct hair, glasses, semi-transparent details, and background-colored fringes.
- Build the composite: Match exposure, color temperature, grain, sharpness, shadow, perspective, and movement.
- Check the alpha: Inspect the transparent version over both light and dark backgrounds. This reveals halos that a single preview can hide.
- Export deliberately: Use a pipeline-friendly alpha format when further compositing is expected, or render a finished master when the job is complete.
- Review the publishing file: Watch the actual encoded deliverable at full size and at the intended viewing scale.
Evaluation has moved beyond still-frame pixel error. The 2026 PROVE-Bench benchmark uses an 80-video paired dataset for quantitative comparison and a 100-video hard subset without ground truth for stress testing, with difficult cases involving shadows, reflections, translucency, and mirrors described in the benchmark paper. That matters operationally because a method can look excellent on individual frames and still flicker when played.
Modern matting work also separates spatial detail from temporal stability. MatAnyone 2 reports example benchmark scores including MAD 4.73 and MSE 0.55 on one benchmark and MAD 2.30 on YouTubeMatte, while a CRGNN real-video test reports MAD 4.24 and Grad 11.74, illustrating the gap between cleaner benchmark material and harder real footage in the reported evaluation. These figures aren’t a substitute for checking your own footage, but they reinforce the production rule: test synthetic or controlled clips, real-world clips, and unseen source conditions before standardizing a method.
Real-time, in-camera removal is moving toward creator workflows that don’t use green screens. Current reporting discusses tools such as CapCut and Runway, while 2026 coverage describes real-time processing of 4K footage as an emerging capability in some workflows through this overview of video background-removal alternatives. The useful question isn’t whether real time sounds impressive. It’s whether the scene has simple enough hair, motion, lighting, and occlusion for low latency to be acceptable.
By the end of 2026, browser-side and on-device processing may become more practical, but fine hair under stage lighting, fast motion blur, and severe occlusion will remain difficult. Offline refinement won’t disappear while clients still expect clean edges across demanding composites.
CreativeClaw connects AI assistants to media-generation and editing tools, including video background removal, so teams can keep briefing, testing, refining, and exporting inside one conversation. Visit CreativeClaw to evaluate a background-removal workflow alongside the other production tools your campaign already needs.
Ready to try it?
Connect CreativeClaw to Claude in under a minute.
Get StartedContinue the workflow