Background Removal AI: A Practical Guide to Better Cutouts

A batch of product images can look finished until someone places the first cutout on its real destination. A pale rim appears around a dark handle, a few pixels of the original studio surface cling to a reflective lid, and a marketplace zoom exposes an edge that looked perfectly acceptable in the thumbnail. The team thought it had automated background removal. In practice, it had automated the first editing pass and moved the quality-control problem downstream.
That distinction matters for marketing teams. Background removal AI can separate a subject quickly, but a usable production asset must also preserve hair, fur, glass, soft shadows, and the subtle boundary pixels that make a composite believable. The right question isn’t only, “Did the tool remove the background?” It’s, “Will this cutout survive the exact size, contrast, and platform where customers will see it?”
Table of Contents
- The Cutout That Almost Shipped
- What Image Matting Actually Means
- Model Families and Where Each One Shines
- How to Read a Bad Cutout
- A Confidence-Aware Workflow for Production Assets
- Privacy Provenance and Disclosure for Uploaded Images
- Choosing the Right Model and Answering the Hard Questions
The Cutout That Almost Shipped
It was Tuesday afternoon, and the creative team was refreshing a ceramic mug line. The night before, someone had sent a batch of product photos through an online background removal tool. The previews looked clean. The mugs stood against transparent canvases, the handles were open, and the files appeared ready for the marketplace upload.
During a color check, a designer placed one mug beneath a softbox simulation and enlarged it to inspect the glaze. A thin light ring traced the lower handle. Another mug showed a dark fringe along its rim. The defects weren’t obvious in the small preview, but they became visible as soon as the assets were viewed at a larger display size.
The team now had two separate jobs. They had to approve the images that were truly ready, and they had to identify which files needed a second model, an edge-refinement pass, or manual retouching. The supposed time-saving batch had, in effect, created a new QA queue.
Practical rule: A preview tells you whether an AI system found the subject. The final-size composite tells you whether it found the edge.
The failure wasn’t proof that automated cutouts are unreliable. Simple, high-contrast subjects can produce excellent results. The problem was treating every image as the same task and every output as final. A ceramic mug with a hard silhouette, a portrait with flyaway hair, and a glass bottle with reflected light demand different decisions from the model and the reviewer.
That production moment also exposed a common workflow mistake. The team inspected the transparent preview, but not the cutout against the actual destination background. A halo that disappears over white can become conspicuous over navy. A missing contact shadow can make a product float, even when the alpha boundary itself is accurate.
The practical lesson is straightforward: background removal is a quality-control stage, not a single-click finish. A good workflow classifies the subject, chooses a suitable model, preserves the alpha matte, checks difficult regions at high magnification, and approves the asset only after compositing it in context.
What Image Matting Actually Means
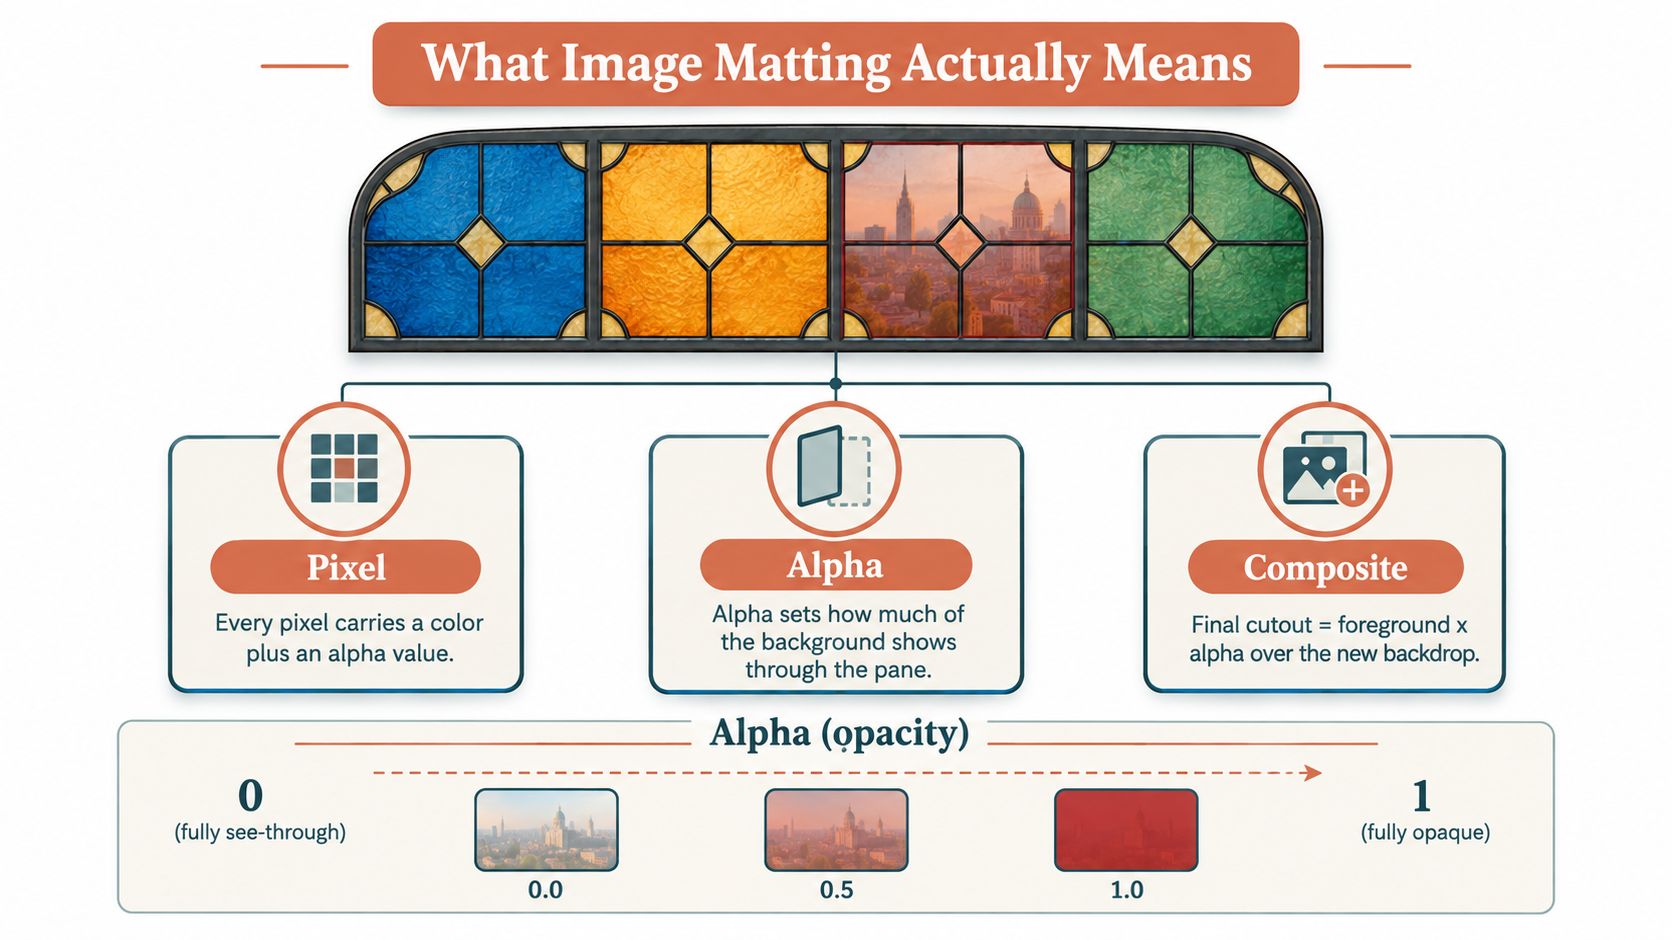
Start with a stained-glass window. Each pane has a color, but not every pane blocks the view behind it completely. A frosted or tinted pane lets some of the cityscape show through, while an opaque pane hides it. Digital image matting works in a similar way. Each pixel carries color information and an alpha value, which describes how much of that pixel belongs to the foreground.
An alpha value of 0 means the pixel is fully transparent. A value of 1 means it is fully opaque. Values between them preserve partial coverage, which is essential around hair, fur, smoke, veils, and motion-blurred edges. The final composite combines the foreground, its alpha information, and a new background.
From a hard mask to a soft matte
A binary mask makes a forced decision. Keep this pixel, discard that pixel. That approach can work for a box with a crisp outline, but it struggles when a pixel contains both subject and background information. Cutting every boundary to opaque or transparent can erase thin strands, create jagged contours, or preserve an unnatural strip of the original background.
A trimap gives a matting system three regions: known foreground, known background, and an unknown boundary zone. The model focuses its most difficult reasoning on that uncertain area. Modern systems increasingly predict a matte without requiring a person to draw the trimap manually, but the underlying problem remains the same. The boundary needs graduated transparency, not a crude switch.
This is why a clean binary mask isn’t equivalent to a professional matte. Research summarized in the history of image matting describes the field’s move from heavily engineered pipelines and manual trimaps toward neural networks trained on composited and real images. On the DIM-481 benchmark, reported SAD fell from 175.4 to 22.4, and on alphamatting.com it fell from 25.61 to 7.34, with lower scores indicating less disagreement between predicted and ground-truth alpha mattes (the deep-image-matting research summary).
Why the distinction matters in production
A clip-path style cutout may look fine in a small card. At large display size, the same result can reveal stair-stepped edges or a pale outline. The replacement background changes the appearance again because every semi-transparent boundary pixel blends with whatever sits behind it.
For a product team, inspect the alpha channel as an editable asset rather than throwing it away after export. For a portrait team, look specifically at hair, ears, translucent fabric, and areas where the subject color resembles the original backdrop. The matte is the information that lets you correct the composite without rerunning the entire operation.
Model Families and Where Each One Shines
No single background removal model has the same strengths across every subject. Training data shapes what a system recognizes easily, while the output format and evaluation method determine whether that recognition translates into a convincing asset.
Portrait-oriented models usually learn strong cues from faces, body shapes, hair, and studio-like scenes. They can be a sensible first choice for headshots and social portraits, but a model optimized for people may treat a product’s thin rim or reflective surface as visual noise. Product-focused systems tend to favor solid silhouettes and catalog-style objects. They may produce crisp hard edges while weakening subtle reflections or transparent packaging.
General salient-object and segmentation models cover a wider range of subjects. That breadth helps when an image contains an unfamiliar object, but it can come at the expense of fine boundary treatment. Glass, feathers, reflective metal, and low-contrast objects require the model to infer partial visibility rather than just identify a colored region.
A practical comparison
| Model Family | Best-Fit Subject | Training Data Focus | Typical Failure Mode |
|---|---|---|---|
| Portrait matting | People, faces, hair, fur | Portraits with natural backgrounds and annotated alpha edges | Oversharpened product boundaries or clipped fine strands |
| Product and e-commerce matting | Hard goods, packaging, catalog objects | Clean product imagery, varied object shapes, high-resolution assets | Softened reflective rims, lost contact shadows, weak transparency handling |
| General segmentation | Mixed subjects and broad image collections | Salient objects and foreground-background separation | Binary-looking edges, uncertain glass, feathers, and low-contrast regions |
| Specialized transparent-object models | Glass, water, translucent packaging | Images where transparency and reflections are central | Color spill, incorrect opacity, or background texture retained in the object |
The dataset matters as much as the label. Research summarized in a deep-image-matting survey describes BG-20k as a high-resolution collection with diverse backgrounds, while AM-2k focuses on animals and PM-10k on portraits (the image-matting dataset overview). These resources reflect a practical reality: an animal’s fur, a person’s hair, and a bottle’s transparent edge create different error patterns.
Portrait systems also illustrate why evaluation must match the subject. MODNet uses semantic estimation, detail prediction, and semantic-detail fusion without requiring a manually supplied trimap. On the PPM-100 benchmark, it achieved an MSE of 0.0044 and MAD of 0.0086, compared with 0.0063 and 0.0114 for the next-best trimap-free method (the MODNet model explanation). Those figures are useful in the context of portrait matting, but they shouldn’t be treated as a universal ranking for mugs, glassware, or video frames.
A model wins only when its training assumptions resemble your asset library.
Choose the evaluation protocol accordingly. Portrait work should emphasize hair and soft boundaries. Product work should test silhouette precision, reflections, and consistent contact with the surface. Transparent-object workflows need alpha inspection and compositing tests, not just a foreground-overlap score.
How to Read a Bad Cutout
A bad cutout rarely announces itself with a completely missing subject. More often, it contains a small boundary error that becomes expensive after the file enters a campaign. Reviewers should look for patterns because each pattern points toward a different correction.
The recurring defects
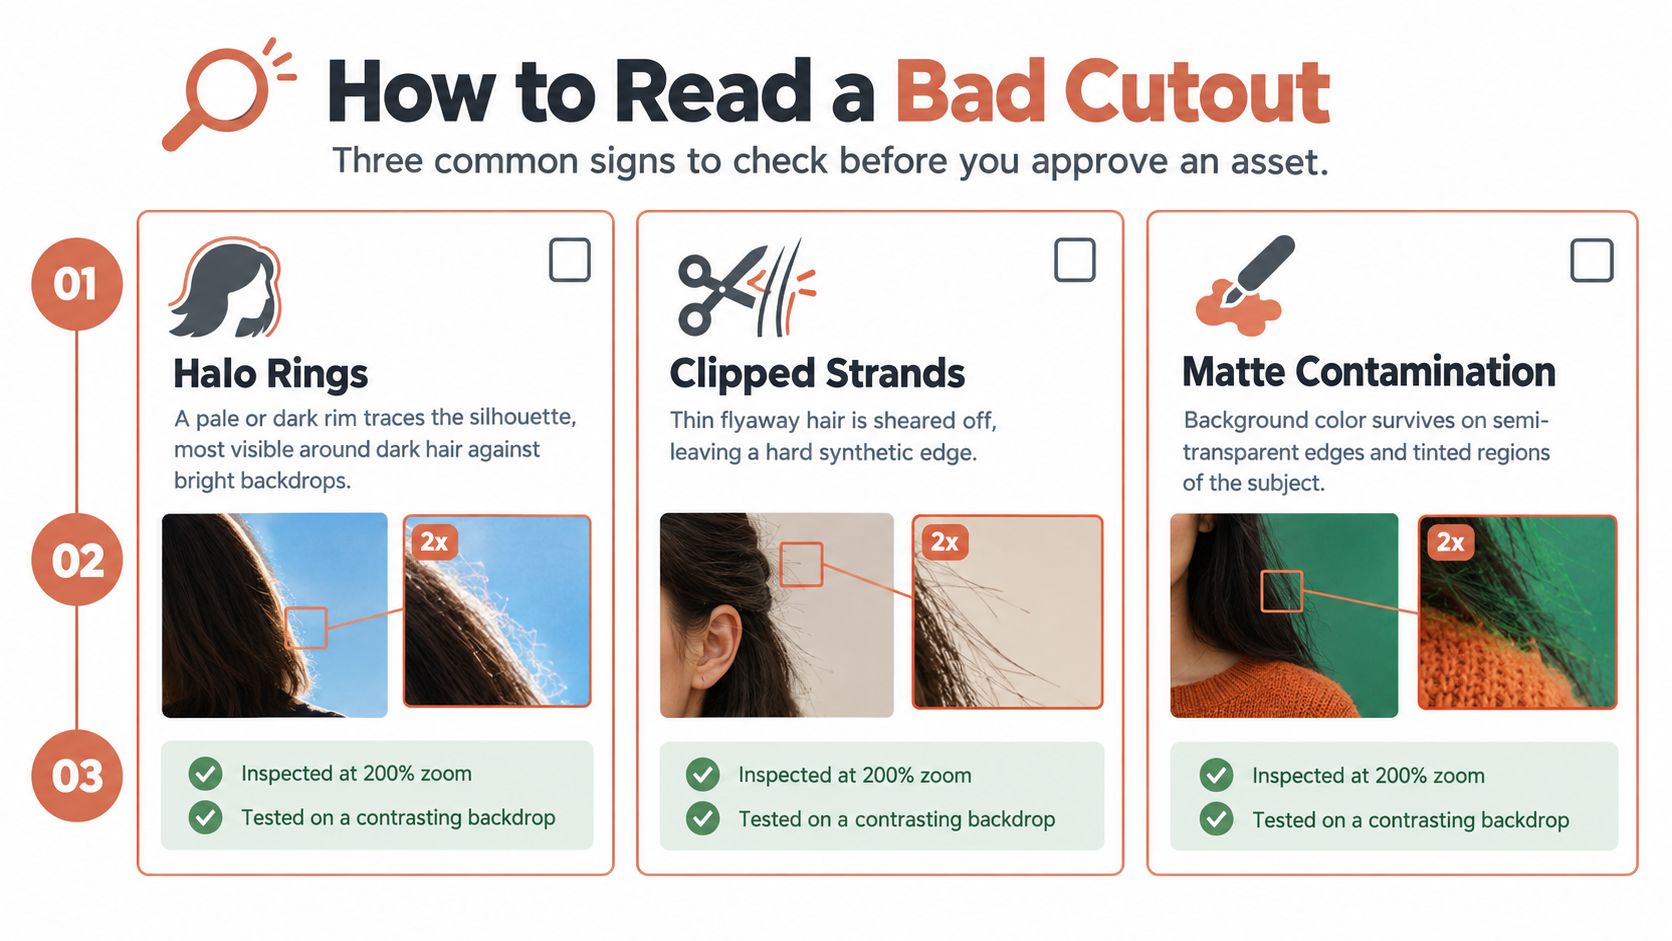
Halo rings appear as pale or dark outlines around the silhouette. They often become visible around dark hair, glossy products, or a subject photographed against a bright background. The model may have retained background-colored pixels, expanded the foreground too far, or refined the edge without correcting color contamination.
Clipped strands occur when the system chooses certainty over detail. Flyaway hair, fur tips, feathers, and thin cables disappear because the algorithm has classified their narrow structures as background or noise. A binary threshold can make the edge look tidy while removing the very detail that gives the subject its natural shape.
Matte contamination is common on semi-transparent or reflective regions. A glass bottle may retain the tone of the old backdrop, while a metallic object may show a fringe that doesn’t belong to the product. In these cases, the model hasn’t merely missed a pixel. It has estimated the object’s opacity or foreground color incorrectly.
Fringed contours can appear around patterned backgrounds or low-contrast subjects. The edge may alternate between jagged and soft because the system is uncertain about where the subject ends. A cutout can also show color spill where the original background has mixed with partially transparent boundary pixels.
A recent source reports performance falling from about 95% in controlled conditions to 85% with complex fabrics and reflective objects, which is a useful warning against treating headline accuracy as production reliability (the analysis of AI image tools for e-commerce). The same source discusses LayerBench, a benchmark with 800 transparent images designed to examine RGB-alpha misalignment and edge degradation. These measures focus on the defect shoppers see, not merely whether the main object was detected.
A repeatable inspection order
- Open the alpha channel at 200% zoom. Check high-contrast borders first, especially dark subjects on white backgrounds and pale subjects on dark backgrounds.
- Inspect thin structures. Look at hair, fur, straps, handles, leaves, wires, and the gaps between overlapping parts.
- Sample low-contrast zones. Compare the subject edge with nearby background tones. Incomplete separation often hides in these areas.
- Composite on light and dark plates. A defect that disappears on one test color may become obvious on the other.
- Compare the original and matte together. Decide whether the issue comes from missing foreground, retained background color, or an overly hard transition.
If the problem is isolated to a few strands, use a refinement brush or manual alpha adjustment. If the entire object has an unnatural contour, route it to another model rather than spending time repairing every edge by hand. Keep the original file and the editable matte so the team can revisit the decision when the asset’s destination changes.
A Confidence-Aware Workflow for Production Assets
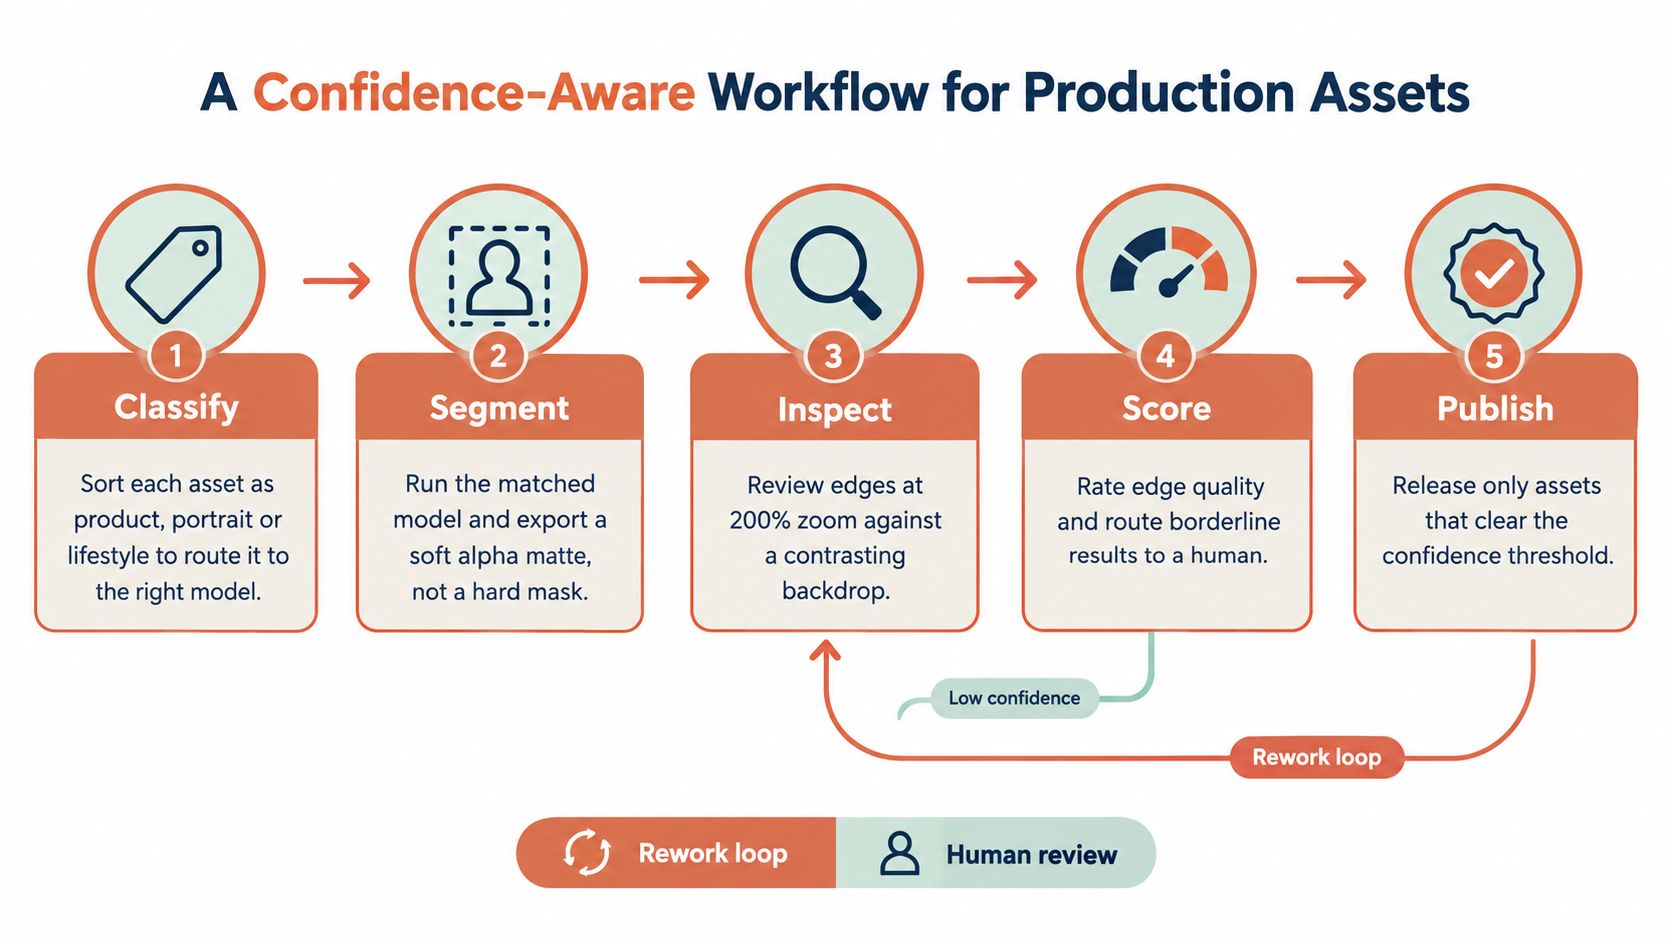
A production workflow should make uncertainty visible. Start by classifying the image as a portrait, product, lifestyle scene, animal, or transparent-object case. This label doesn’t need to be perfect. It only needs to prevent the system from sending every image through the same assumptions.
Build the first pass around the asset
Run a primary model that matches the subject, then retain its soft alpha matte. For difficult or commercially important images, run a fallback model as well. Compare the two mattes around the regions most likely to fail, rather than comparing only the full-image preview.
A confidence score should be treated as a routing signal, not a guarantee. Low confidence around a product’s reflective rim should trigger inspection. High confidence across a simple silhouette can support faster approval, but the final destination still deserves a contextual check.
Add refinement before publication
Inspect the edge at 200% zoom against a contrasting backdrop. Preserve contact shadows when they communicate how a product rests on a surface, but don’t confuse a natural shadow with unwanted background. For hair, fur, and glass, route only the affected regions to manual refinement when possible. A full-image retouching pass is slower and can damage areas that were already correct.
Keep the output layered where the workflow permits it:
- Original: Preserve the untouched source for later reprocessing.
- Matte: Store the alpha channel separately or inside a file format that retains it.
- Composite: Save the version placed on the intended campaign or marketplace background.
- Record: Note the model, operation date, reviewer, and destination version.
Use stable naming that identifies the subject, campaign, revision, and output role. That prevents a transparent master from being mistaken for a marketplace-ready JPEG and makes it easier to compare results after a model change.
For a useful external example of how an e-commerce workflow can frame the operation, review how MerchLoom handles background removal. For a CreativeClaw-specific implementation path, teams can also use the background removal product kit walkthrough.
Approve against the real destination
The last check should use the actual end-use background, crop, and display context. Marketplace imagery, paid ads, and social posts can impose different visual pressures. A transparent PNG that looks excellent in an editor may show an edge problem once it is scaled, compressed, or placed over a brand color.
A useful workflow loops rejected assets back to inspection rather than deleting them. The reviewer should record the defect category, the attempted remedy, and whether the next model improved the same region. Over time, that log becomes a practical training set for routing decisions and helps the team distinguish a model limitation from a one-off input problem.
Privacy Provenance and Disclosure for Uploaded Images
Background removal can look like a low-risk utility because the visible operation is simple. The risk changes when the uploaded material includes customer photos, employee headshots, children, unreleased products, private interiors, or campaign concepts. The original may be discarded while the derived cutout remains identifiable and usable elsewhere.
Before choosing a vendor, ask where the image is processed, how long the original and matte are retained, who can access them, and whether uploads may be used to improve a model. Don’t rely on a generic statement that files are “secure.” Your team needs operational answers that fit the data and the contract.
Trace the asset through the pipeline
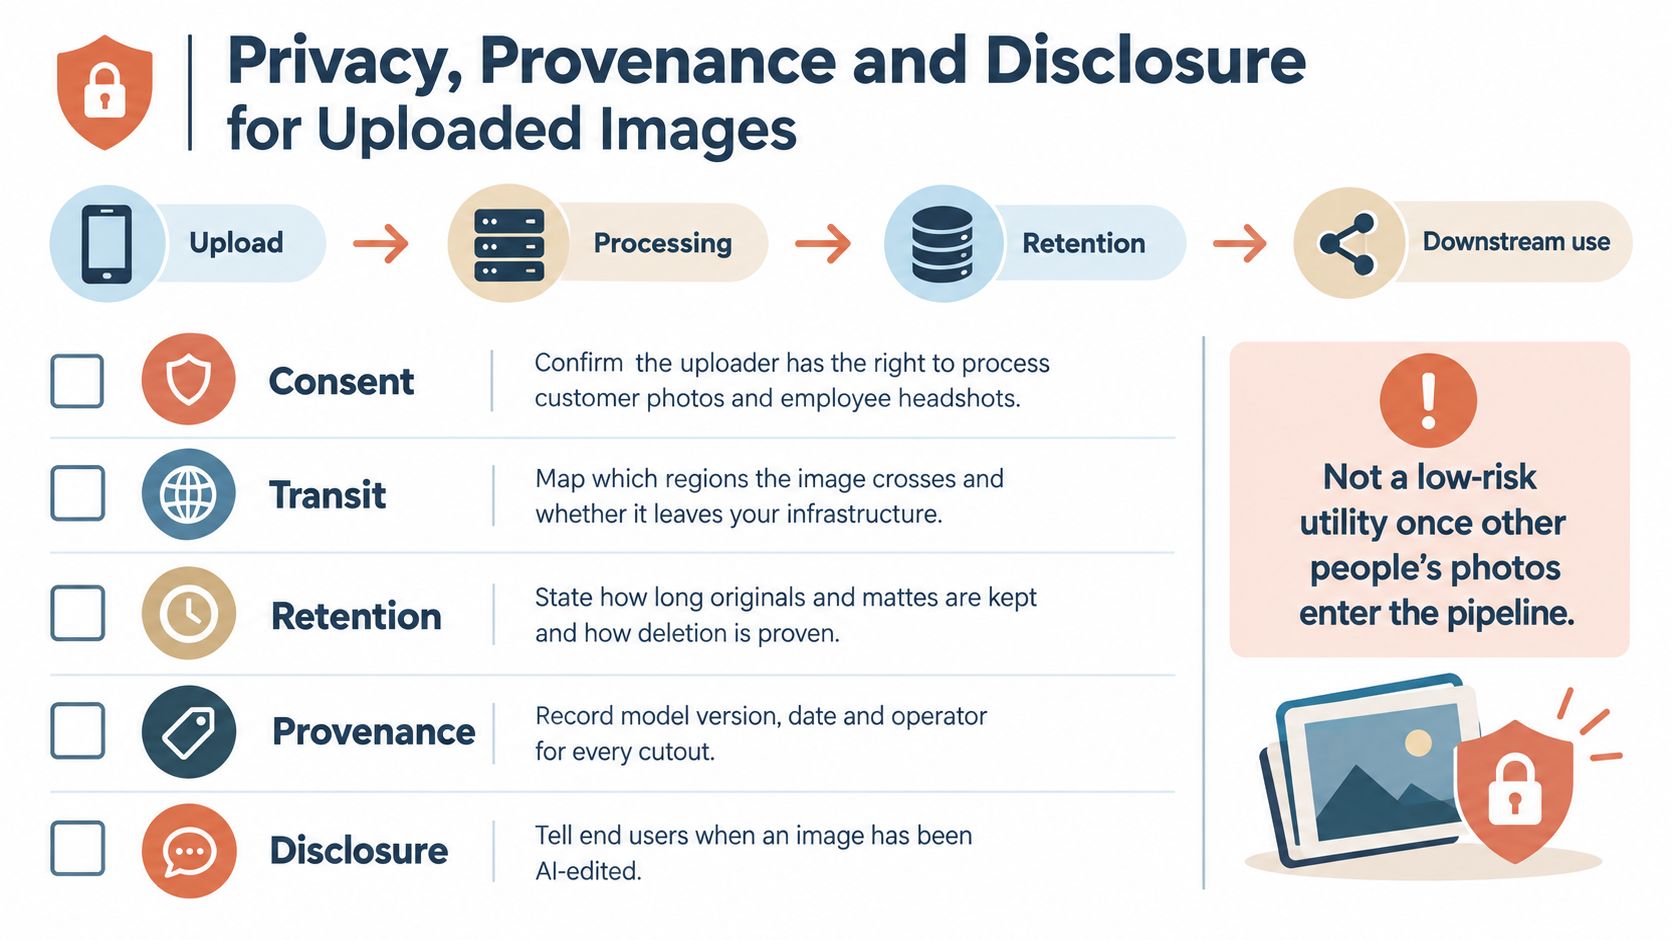
Map four stages: upload, processing, retention, and downstream use. The image may cross regional boundaries during processing. The output may receive a durable URL. A designer may download the transparent version into a separate storage system. Each step creates a new place where access, deletion, or provenance can become difficult to verify.
A governance record should capture:
- Consent: Confirm that the organization has permission to process customer images and employee portraits for the intended marketing use.
- Transit: Document where the image travels and whether processing leaves your controlled environment.
- Retention: Define how long originals, mattes, and composites remain available, then verify that deletion occurs.
- Provenance: Record the model version, operation date, source asset, and responsible operator.
- Disclosure: Decide when an AI-edited image should be identified to customers, platforms, or internal reviewers.
Industry coverage has pointed to provenance and disclosure standards such as C2PA, but teams should validate current platform rules and legal requirements before treating any standard as a complete compliance solution. The key operational idea is simpler: keep an audit trail that explains what changed and who approved the result.
A transparent PNG can be a derived personal-data asset, not just a design file.
Marketing teams should also define whether removing a background changes the implied meaning of an image. A composite can place a real person or product in a setting that wasn’t present during capture. That may affect endorsement, context, or brand-safety review even when the subject itself hasn’t been altered.
Before uploading customer or talent images to any tool, read its privacy policy (for example, the CreativeClaw privacy policy) and write down who approves uploads and when files are deleted.
Don’t wait until a marketplace rejects an image or a customer asks how a portrait was edited. Add a privacy review to the same intake process that checks resolution, subject type, and destination. A fast cutout isn’t useful if the team can’t explain where the source went or whether the final asset was approved for that use.
Choosing the Right Model and Answering the Hard Questions
Model selection should follow the asset mix, not a universal ranking. A portrait studio may prioritize hair preservation and natural translucent edges. A catalog team may care more about consistent product contours, reflective packaging, and repeatable output across a large set. A social team may accept a faster first pass for simple images but require a stronger fallback for campaign heroes.
Score candidates against the work your team ships:
| Decision criterion | Question to ask |
|---|---|
| Edge fidelity | Does the matte preserve thin structures without leaving a halo? |
| Subject fit | Was the model designed or evaluated on portraits, products, animals, or transparency? |
| Composite behavior | Does the output remain credible over both light and dark backgrounds? |
| Operational speed | Can the workflow meet the required turnaround without skipping review? |
| Deployment | Can sensitive images remain on-device or inside an approved processing boundary? |
| Governance | Are retention, deletion, access, licensing, and provenance documented? |
| Recovery | Can the team export and edit the alpha matte when the first result fails? |
Questions teams ask after the first batch
Will a higher-resolution input always solve edge problems? No. More pixels can preserve more detail, but resolution can’t correct a model that misunderstands a transparent object or confuses background color with foreground color. Review the source quality, lighting, contrast, and subject category alongside the output.
What should happen in a bulk batch? Process a representative sample before approving the whole run. Include hard edges, low-contrast subjects, reflective surfaces, hair, and lifestyle backgrounds. If the sample reveals a repeated defect, change the routing or model before the remaining assets create more rework.
What if two models disagree? Compare the disagreement region, not just the overall image. One model may preserve more hair while another gives a cleaner product silhouette. Route the asset to a reviewer when the difference affects a commercially important boundary.
When is human refinement worth the cost? Use it where the defect changes trust, readability, or compliance. A tiny flaw on an internal draft may not justify intervention. A halo around a hero product, a clipped hand in an ad, or a contaminated glass edge usually does.
How do we keep sessions consistent? Lock the model version, refinement settings, output format, naming rules, and destination background for a campaign. Save approved mattes and rejected examples. Consistency comes from a controlled process, not from assuming the model will behave identically on every image.
The final pre-publication audit
Match each common failure with the check that catches it:
- Halo: Composite over a contrasting light and dark plate.
- Clipped detail: Inspect hair, fur, gaps, and thin structures at 200% zoom.
- Color spill: Compare the edge color with the original background and foreground.
- Floating product: Review contact shadows and the intended surface.
- Incorrect transparency: Inspect the alpha channel on glass, packaging, and reflective materials.
- Governance gap: Confirm consent, retention, provenance, and destination approval before release.
For teams comparing assistants and workflows, the guide to removing backgrounds with Claude offers another implementation reference. The broader principle is more important than the tool name: choose the model, review method, and governance controls as one system.
CreativeClaw lets marketing and e-commerce teams remove image backgrounds, preserve transparent PNG outputs, and connect cutout work with other image and video editing operations inside an assistant workflow. Use CreativeClaw to compare variants, refine production assets, and build a review process that checks alpha-edge quality before campaigns and marketplace listings go live.
Ready to try it?
Connect CreativeClaw to Claude in under a minute.
Get StartedContinue the workflow